INSTALL AND CONFIGURE YOUR SSL CERTIFICATE ON WINDOWS SERVER 2012 IIS 8
Print
Modified on: Mon, 9 Jan, 2017 at 10:09 AM
Install and configure your SSL Certificate on Windows Server 2012 - IIS 8
Open the ZIP file containing your certificate.
|
|
Save the file named your_domain_name.cer to the desktop of the web server you are securing.
|
|
From the Start screen, click or search for Internet Information Services (IIS) Manager and open it.
|
|
Click on the server name.
|
|
From the center menu, double-click the "Server Certificates" button in the "IIS" section (it is in the middle of the menu).
|
 |
From the "Actions" menu (on the right), click on "Complete Certificate Request..." This will open the Complete Certificate Request wizard.
|
 |
Browse to your_domain_name.cer file that was provided to you by COMODO. You will then be required to enter a friendly name. The friendly name is not part of the certificate itself, but is used by the server administrator to easily distinguish the certificate. Choose to place the new certificate in the Personal certificate store.
|
 |
Clicking "OK" will install the certificate to the server.
|
|
Once the SSL Certificate has been successfully installed to the server, you will need to assign that certificate to the appropriate website using IIS.
|
|
From the "Connections" menu in the main Internet Information Services (IIS) Manager window, select the name of the server to which the certificate was installed.
|
|
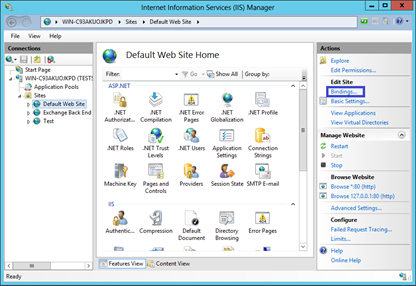
Under "Sites," select the site to be secured with SSL.
|
|
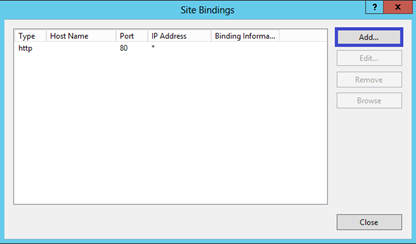
From the "Actions" menu (on the right), click on "Bindings..." This will open the "Site Bindings" window.
|
 |
In the "Site Bindings" window, click "Add..." This will open the "Add Site Binding" window.
|
 |
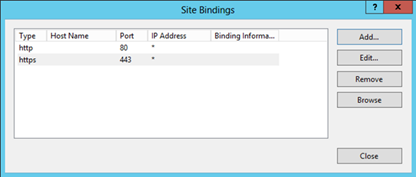
Under "Type" choose https. The IP address should be the IP address of the site or All Unassigned, and the port over which traffic will be secured by SSL is usually 443. The "SSL Certificate" field should specify the certificate that was installed and click OK
|
 |
|
 |
Your SSL certificate is now installed, and the website configured to accept secure connections.
|
|
Did you find it helpful?
Yes
No
Send feedback Sorry we couldn't be helpful. Help us improve this article with your feedback.


